This is the second post in a series on how to make games with impact.js . You can find the first post here.
I know you are getting all excited about making computer games and I am telling you about boring stuff like the file structure – what directories you should have and what should be in them. Trust me, you will run into all kinds of problems if you DON’T have these files , so just take a minute and see that you do.
When you purchase impact, you should have the following files:
index.html
weltmeister.html
Top level directories
You should also have three directories
- lib , which contains three directories, game, impact and weltmeister
- media , which only comes with a font file to start, but where you will end up putting all of your art and music
- tools – which we will ignore until our game is finished. Just know that file should be there and contain 4 files, three of which have ‘bake’ in the name
The Game Directory
The game directory is where you will be working most of the time. It has two directories,
entities – comes pre-loaded with delay.js , levelchange.js, trigger.js and void.js . Additional entities you create will be saved here, for example, in my game there is a hunter (that the player controls), a buffalo that roams back and forth, a rabbit that runs all over, a snake that kills you if you step on it – these are all entities
levels – this is empty when you download impact.js but your levels you create will be saved here.
There should also be a file in this directory named main.js As the name implies, this will be the main JavaScript file for your game and you will be editing it a lot.
You need some artwork!
Before you can open up the weltmeister and start creating some levels, you need artwork. To start with, I recommend:
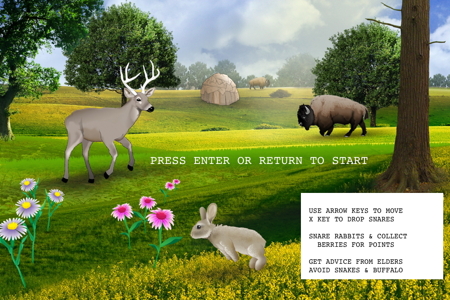
- An opening screen- tell the player what they need to do to get the game to start and also how to move, earn points and die. My start screen is above.
- Sprite sheets for the entities like buffalo, hunter, etc.
- Tile sheets for the background objects like grass, sky and trees.
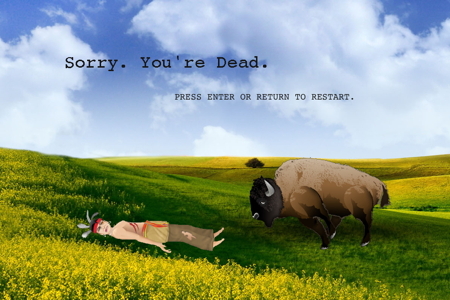
- A death screen – my death screen is shown below
- A win screen
You can use impact to write and position the text on the image, but since I was only using each image once in this game, I just put the text on the image when I created it. I’ll explain how to use impact to position text in another post.
Want to buy the game that includes this ‘intermission game’ ? Check out Fish Lake
![]()