By Abby Jones
Ugh, my wrists! We’ve all been there, right?
The start of a new school year, a new project—a new something!—that needs labels.
If you are using our games you may decide to assign each student a username and password
But that isn’t the bad part; you’ve got thirty or so students that need them – maybe 90 students if you teach middle school – and you’d like to print out labels they can slap on their folders and not lose (ha ha ha). As long as you are making those labels anyway, you may as well include their usernames and passwords.
I know what you’re thinking. You grab some mailer labels you got at Office Depot, get out your Sharpie, and go to town. Afterwards, you grab some ice, wrap your wrists in an ACE bandage, and maybe sip some wine while binge watching something—anything—on Netflix, and fall asleep on the couch. That actually doesn’t sound so bad, except for the long-term damage to your wrists.

There’s an easier way. You work hard enough as it, sometimes buying your students’ supplies and working thankless hours at home coming up with lesson plans, ideas to keep students engaged, new Netflix binging ideas (oh, be honest!) and whatever amazing things you do daily.
So, sit back, grab a glass of wine, and let us lighten your load a bit. It’s time to talk about labels. Let’s do it!
Imagine this: You have 30 students at the start of a new class, and you’ve purchased for them 30 math folders . You want a label on each with student name, username and password so they don’t have to look it up or ask you every time they are using the computers.
You could label them by hand, but you remembered that you have a computer, a printer, and Microsoft Office productivity software (hopefully all of this is provided by your school). Note that Office 365 does NOT have mail merge. I’ve written previously on the differences between Office 365 and the desktop version of Office. Contrary to popular belief, these are not identical.
Your students need the following information on their folder to make sure they can log on easily: Student Name, Username to Logon to the computer and Password
No problem. It looks like a lot of steps but, seriously, after you’ve entered their names and usernames, etc. the rest is just a couple of minutes.
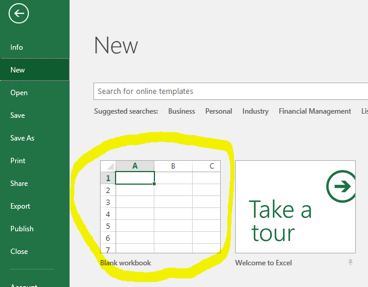
First, we’ll start Microsoft Excel. I’ll be using 2016 to demonstrate how easy this is. When you open Excel, you will first need to choose a blank worksheet. Click the BLANK WORKBOOK option on the left of the screen.
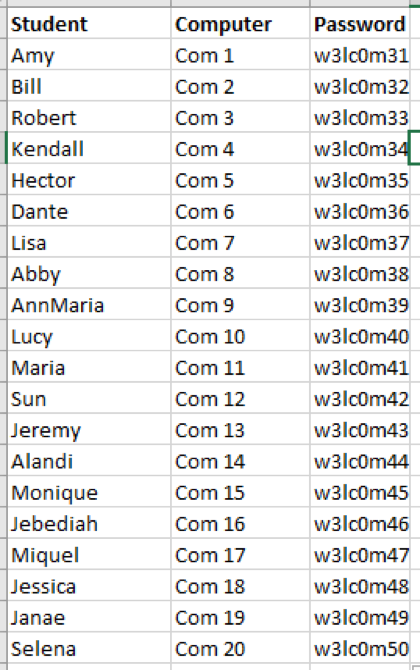
Next, we are going to create our student list. I’ve entered some fictional data below.
Open Microsoft Word and start a blank document. The process is the same as opening a new document in Excel, so I won’t insult your intelligence with mindless repetition.
Now that the blank document is open, go to Mailings, as shown below.

Now, we need to first import the list we made in Excel. We do this by selecting the Excel sheet as a ‘source’ document. Here are the steps:
- Select Select Recipients in the Mailings menu.

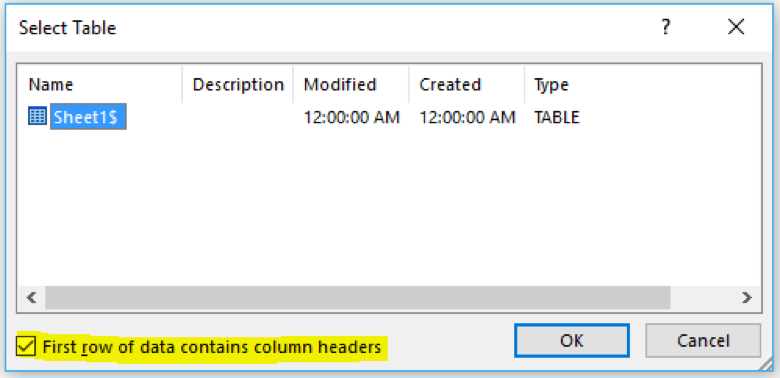
2. Click on Use an Existing List… Navigate to your StudentList.xslx (wherever you saved it). If you selected the correct file, you will see this windows. Accept all default values and make sure that the highlighted area is checked. We will use these headers as our merge fields.
3. Click OK and watch nothing happen. You will see a blank document. That’s good!
4. Now that we’ve selected our source document to create the labels, we need to create the labels!
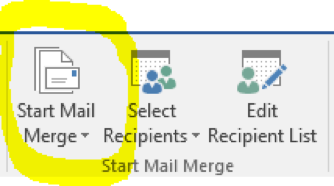
5. In the same Mailings menu we are currently in, click on Start Mail Merge. Here’s where we are now.
6. Next, click on Labels. (Right?! Because we’re like, you know, making la— sorry, sorry. Back to it.)
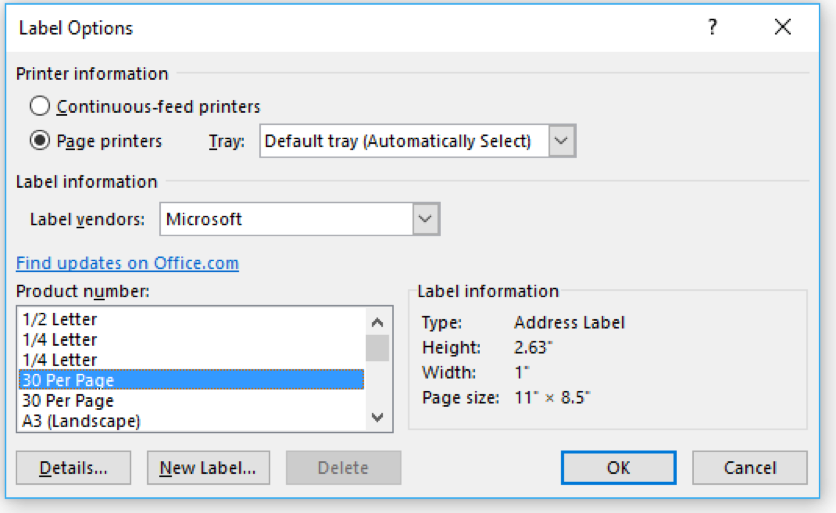
7. Now we get a new window. Right away (if you are old like I am) you will see a blast from the past: the continuous feed printer. AKA dot matrix, AKA the 80s called… We want Page Printers. In fact, make your selections identical to mine and click OK.
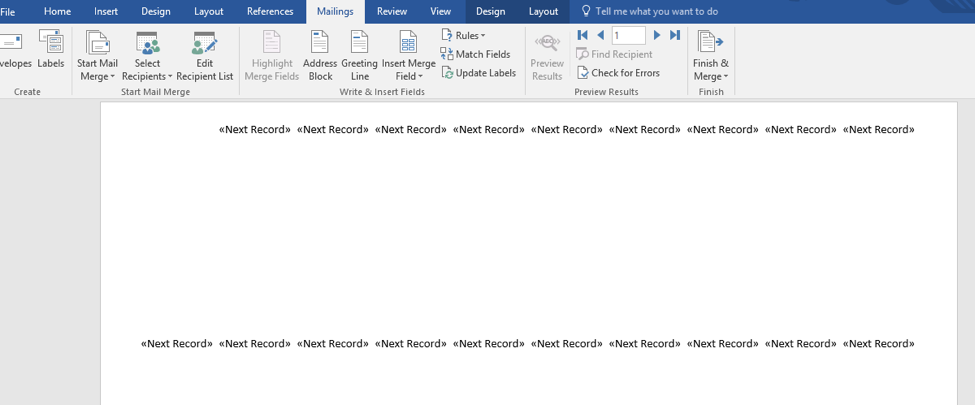
 8. Now things get interesting. Below, if you’ve done it right, you will see a new layout (landscape) with a bunch of gobbled-gook on it, saying <<Next Record>>.
9. That’s okay. But let’s put our cursor in the top left corner like this.

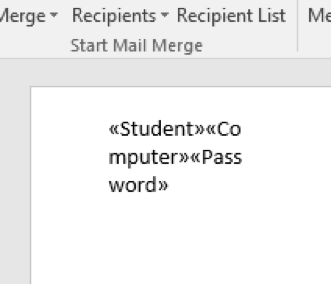
10. In the same Mailings menu we’ve been using, click on Insert Merge Field. A menu will drop down and contain all the columns we created in our student list: Student, Computer, Password. You will have to enter them one at a time, so be patient. They will populate the first label like this:
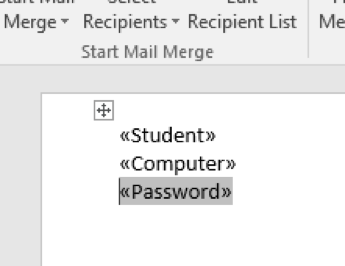
To avoid this, press Enter after adding each one. This will put them on their own line in the label, like this.
11. Here’s where we save those wrists! Simply click Update Labels. You’ll see this if you were successful.
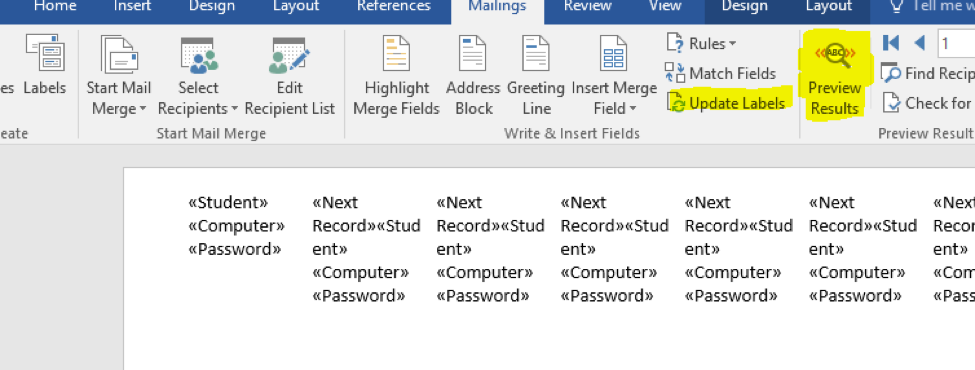
12. We’re almost done! We can’t print out this mess, but that’s okay. This is Microsoft formatting doing the heavy lifting. All you have to do now is click on Preview Results to see your creation come to life! (Okay, that’s a bit dramatic)
Voila!
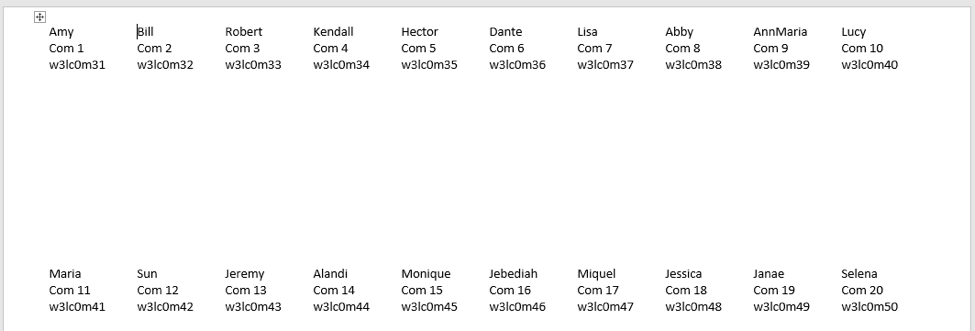
You’ve done it, and you should feel great. It’s not rocket surgery, but sure saves time, and wear and tear on your wrists. So, grab that glass of wine, turn on Netflix, and binge watch Game of Thrones like you’ve been wanting to.
Heck, have two glasses.